In the previous article we saw how to take our comma-separated list of google contacts, and play with them using OpenRefine. We learned how to do things like filtering, faceting, normalizing data, removing duplicate rows and other pretty common tasks.
In this article we will see how to use OpenRefine to enrich our datasets with data from any web service available on line.
We will geocode each contact using google maps web service. For each address we will get the whole json response and we will learn to parse it, extract the coordinates, and save them in a latitude and longitude columns.
Preparing our address column
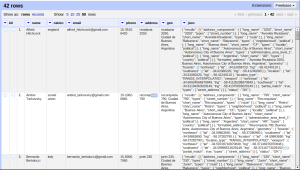
This is how our dataset looked like after all the cleaning up we did in our previous article.
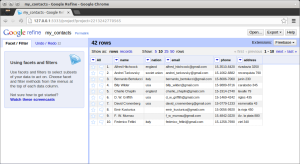
You can see that we have an address column that we are going to use for georeferencing.
A good advice before georeferencing a dataset, is to pick a couple of known addresses and test them on the web service. Then you can try completing the info to see what works best.
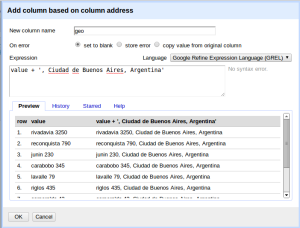
In our case, all the addresses are from Buenos Aires, Argentina. So I’ll create a new column with that info.
Just click on the address column, Edit column, Add column based on this column, and enter the following formula:
value + ', Ciudad de Buenos Aires, Argentina'
The next step will be to use this column to access the google maps web service.
Google maps geocoding API
Google maps geocoding request should have the following syntax:
http://maps.googleapis.com/maps/api/geocode/json?sensor=false&address=the_address_im_looking_for
So we will just create another column based on the output of the web service for every address.
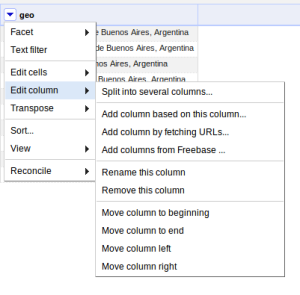
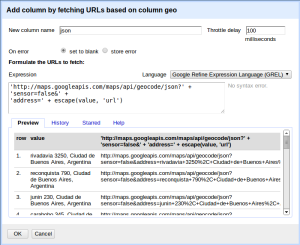
Click on the geo column, Edit Column, Add column by fetching URLs
We will enter json as the name of the new column. Most web services impose some kind of restriction on the use of their API, so you have to be gentle on them not to be banned. We will tell OpenRefine to wait for 100 milliseconds before accessing the web service for another row.
The formula is pretty simply. We just concatenate strings to build the web service url. The only tricky part is the escape function. Because our addresses can have strange characters, we have to encode them in order to build a valid URL.
'http://maps.googleapis.com/maps/api/geocode/json?' +
'sensor=false&' +
'address=' + escape(value, 'url')
You will see a huge column with the whole web service response in json format.
The best thing to do is to study the output of the web service on a browser. Just open your browser and issue some query like this:
http://maps.googleapis.com/maps/api/geocode/json?sensor=false&address=rivadavia 3250, Ciudad de Buenos Aires, Argentina
You’ll see that google maps API certainly gives us a lot of information
{
  "results":[
    {
      "address_components":[
        // [...] lot's of info we don't really care about [...]
      ],
      "geometry":{
        "bounds":{
          // [...] more useless stuff [...]
        },

        // [...] this is what we are looking for [...]
        "location":{
          "lat":-34.6106022,
          "lng":-58.4124011
        },
        [...]
Json data is also a valid javascript object. So in order to get to the lat and lng value, we have to access the first item of results (which is an array) and then read location property of the geometry property. In javascript terms this is:
json.results[0].geomertry.location.lat
json.results[0].geomertry.location.lng
So that’s exactly what we’ll do.
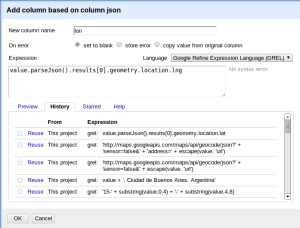
The json output is saved as a string, so first we will have to parse it, and then access it like a JavaScript object. So we’ll create a new column named lat based on the json column, and enter the following formula:
value.parseJson().results[0].geometry.location.lat
Now we’ll do the same but with a column named lon and reading the lng value of location.
Tip: when entering the formula you can click on the History Tab to reuse a recently used formula.
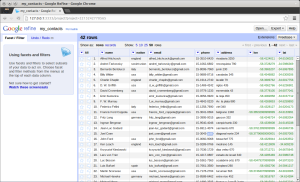
You can now remove the json column, and that’s it. This is how our geocoded dataset now looks like:
You can see that the possibilities are endless.
Going the free-libre way
Google maps usually does a great job geocoding your addresses, but it has a serious limitation. Not only does it limit you to 2.500 geocodes a day, but it requires that the resulting application must show data using google map. Besides, google may change this policies anytime, imposing new constraints on it’s usage.
Or perhaps you’re just like me and you prefer APIs based on open data. In this question at http://ask.schoolofdata.org you can find other open source alternatives for geocoding your data.
Here we will use MapQuest Nominatim API to geo code our data. This is one of the sources backing OpenStreetMap queries. (we will also rename lat and lon columns to google_lat, and google_lon, so that we can later compare the results).
The steps are exactly the same, we will just have to change the url of the web service and the formula to extract the latitude an longitude according to the json returned by the web server.
This is the formula to access the web service:
'http://open.mapquestapi.com/nominatim/v1/search.php?' +
'format=json&' +
'q=' + escape(value, 'url')
Fortunately, the json ouput returned by Nominatim is much simpler than google’s. You can try this query on your browser:
http://open.mapquestapi.com/nominatim/v1/search.php?format=json&q=av rivadavia 790, ciudad de buenos aires, argentina

[
  {
    "place_id": "2453694341",
    "licence": "Data © OpenStreetMap contributors, ODbL 1.0. http://www.openstreetmap.org/copyright",
    "osm_type": "node",
    "osm_id": "2190652372",
    "boundingbox": [
      -34.608323257143,
      -34.608223257143,
      -58.377540908163,
      -58.377440908163
    ],
    "lat": "-34.6082732571429",
    "lon": "-58.3774909081633",
    "display_name": "790, Av. Rivadavia, Avenida de Mayo, Monserrat, Autonomous City of Buenos Aires, C1035AAA, Argentina",
    "class": "place",
    "type": "house",
    "importance": 1.401
  }
]
And this is the expression I used to create the osm_lat and osm_lon columns from the output json
value.parseJson()[0].lat
You should try with different web services and see which works best. In my case, some addresses where better handled by google and others by OpenStreetMap. The big difference is that you can always help OpenStreetMap get better (that’s the floss way). Read this article for a list of other geocoding APIs available for free.
Refining your address column
Refining data is usually an iterative process. You make a few transformations, see how it went, and you try to improve on that.
After geocoding the addresses with OpenStreetMap web service, I noticed that there were a couple of them that wouldn’t be recognized. We already know how to spot them. Just click on the lat or lon column, issue a text facet, and facet by blank. (or customized facet, facet by blank).
You can see there are ten addresses that Nominatim failed to geocode.
I picked a few and tested them manually with the webservice to see if I could spot what was wrong. I realized that a couple of them where Avenues, and they could be recognized if I just added an ‘avenida’ in front of them, like this:
Hand-picking the rows to edit
For this kind of situations, is really useful to work starring and flagging row. I’ll just mark with a star those which are avenues, and edit them with a formula. Just click on the star icon in the first column for each avenue, facet by star, and include only the starred ones.
Then, on the address column, click on Edit cells, transform, and enter the following formula:
'avenida ' + value
Now, with the data still faceted by star (we don’t want to re-geocode the whole dataset) add once again the column from the Nominatim url. Remember, just click on address, Edit column, Add column by fetching URLs, enter osm_json as the name and enter the following formula (don’t forget you should have it in the history tab):
'http://open.mapquestapi.com/nominatim/v1/search.php?' +
'format=json&' +
'q=' + escape(value, 'url')
Now you can update the value of the osm_lat and osm_lon column by parsing the osm_json column. Click on osm_lon, Edit cells, transform. Here you can also reuse the previous formula, but you’ll have to tweak it a little bit. Just look in history and fetch this formula:
value.parseJson()[0].lat
This time, we are not creating a new column from osm_json, we are editing an existing column. So value is empty. Just adjust the formula to point to the osm_json column instead.
cells.osm_json.value.parseJson()[0].lat
Do the same with the lon column, and then you can remove the osm_json column.
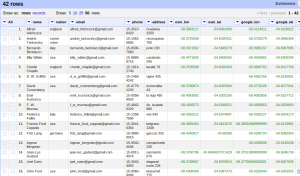
This is what our dataset finally looks like:
It’s pretty common to process a whole dataset, and then filtering down on those strange cases that need a little more work. Working with facets and starring ‘rebel’ rows allows you to hand-pick the ones you want to work with.
Next steps
As you have seen, as long as you can encode your query in a URL, you’re good to go. With this technique you could also take the result of several web services, parse and combine them, and then create new columns with that info.
Here and here you have a couple of articles with more examples like this.
Also, applying a similar approach, you can fetch information from related web pages. Instead of fetching from a web service, you would fetch data from a regular HTML page, and then you would use the parseHtml() function instead of parseJson(). That’s a pretty simple way to come out with a basic scrapper.
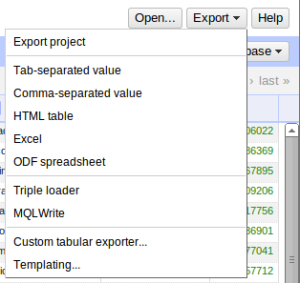
After all this work, we just have to export it as a comma-separated value and we are ready for the next step.
In the next article we will see how to see our data on a map and also how to expose it as a web service using CartoDB. So stay tuned.





[…] the second part we used OpenRefine to access exteral web services like Google Maps and OpenStreetMap to geocode the […]
It’s amazing and useful tricks. Best regards from Belarus!
thanks!
[…] tornare utile come tool Open Refine da un lato, e le preziose indicazioni di questo post “Using OpenRefine to geocode your data with Google and OpenStreetMap API” da cui ho preso spunto ed ispirazione dopo aver assistito al mini-corso della sezione di […]